To connect Futuri AudioAI™ to your station's automation system, your IT/engineering team will work with your Futuri Implementation Manager to install our Echo software on your system. You will also need to configure your NexGen Automation System to accept audio cuts from Futuri AudioAI™. These technical instructions will help guide the process.
TABLE OF CONTENTS
Now Playing Setup
The Now Playing export from NexGen to Futuri can be set up on any machine with NexGen, but you must be logged in as an administrator.
In NexGen’s main menu, go to Config, click Station, and select the station you’re integrating with Futuri.
Note the station’s number on the Station screen because you’ll need that later.
Once you’ve selected your station, click the Export button.
Fill out the export details as listed in the screenshot below. Futuri will provide the username and password information needed for lines 7-9.
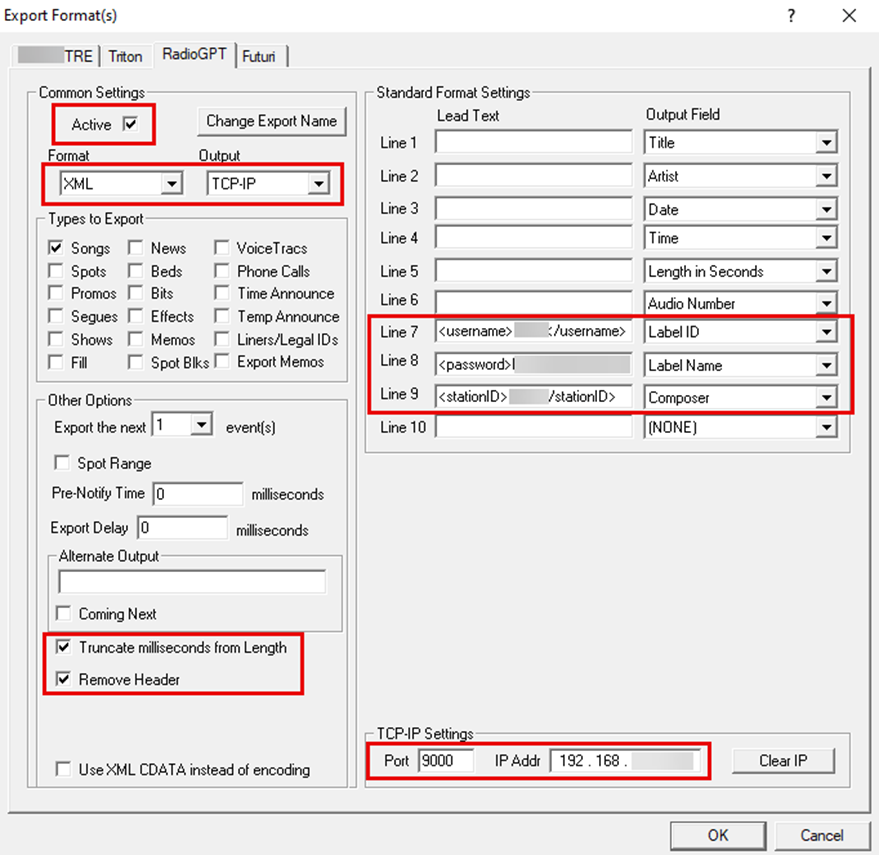
TCP-IP Settings notes:
The IP Address should be the internal IP of the PC that will run Echo (likely your utility machine) (and cannot be 0.0.0.0 or 127.0.0.1). The port should generally be 9000 for the first station you configure, 9001 for the second station, etc. (since each port can only be used for one purpose).
Once you've configured this Now Playing export, click OK. For the changes to go into effect, you'll need to restart NexGen on the Aserv. However, restarting the entire computer is unnecessary, so this task can usually be done within the duration of one song.
Import Setup
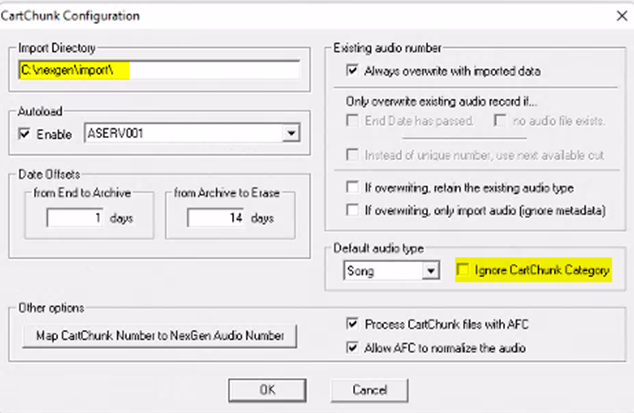
- Navigate in Nexgen to CartChunk Configuration > Import Directory.
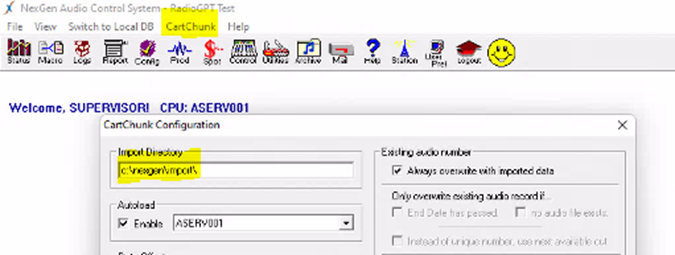
- Set the import directory (typically C:\nexgen\import).
- Make sure “Ignore CartChunk Category” is not checked.
Echo Setup
Futuri's Echo software sends a copy of the station’s music logs, which are required for Futuri Futuri AudioAI™ Breaknotes.
As of version 2.8.1.11 (released Fall 2023), Echo can also send Now Playing information to Futuri.
Please fill out the Echo Installation form here so your technical implementation specialist can preconfigure your Echo files. After receiving your Echo files, you can proceed to the Echo installation.
To install Echo (typically on the station’s utility machine), create the folder C:\Echo\XXXX (where XXXX is the station’s call letters) and extract the contents of the provided Echo.zip to the same folder. If you are setting up multiple stations, each should have a folder in C:\Echo (with its own Echo files inside).
NOTE: Microsoft .NET 4.8 or newer. or higher is required for Echo. If you're running Windows 7 or higher, you should be all set, but If needed, you can download .NET 4.8 by clicking here and following the instructions.
After confirming .NET 4.8 is installed, run Echo.exe and navigate to File > Boot on Startup so that Echo will start up with the PC.
Testing
Once the steps above have been completed and Echo is running, ensure there are no noticeable errors on Echo’s screen.
Ensure that Futuri receives the next song played in NexGen (assuming you have already restarted NexGen on the Aserv).
If you configured NexGen to point its Now Playing export to Echo, the Now Playing entries should also be displayed in Echo's GUI. If you configured NexGen to point its Now Playing export directly at Futuri's web servers, that data will not display in Echo.
To test the music log push process, you can move the logs around to simulate a new log:
- Go to Echo’s watch folder (found in the input field in station.xml, likely R:\NexGen\Music).
- Cut/paste today’s log and all future logs to the desktop (or some other folder). They must be CUT, not COPIED.
- Cut/paste the log(s) back into the watch folder.
- Within about 60 seconds, Echo should detect a change and send the log files to Futuri.